Secure VTY Ports with a Standard IPv4 ACL
Summary
This topic configure a standard ACL to secure VTY access. Start learning CCNA 200-301 for free right now!!
Table of Contents
The access-class Command
ACLs typically filter incoming or outgoing traffic on an interface. However, an ACL can also be used to secure remote administrative access to a device using the vty lines.
Use the following two steps to secure remote administrative access to the vty lines:
- Create an ACL to identify which administrative hosts should be allowed remote access.
- Apply the ACL to incoming traffic on the vty lines.
Use the following command to apply an ACL to the vty lines:
R1(config-line)# access-class {access-list-number | access-list-name} { in | out }
The in keyword is the most commonly used option to filter incoming vty traffic. The out parameter filters outgoing vty traffic and is rarely applied.
The following should be considered when configuring access lists on vty lines:
- Both named and numbered access lists can be applied to vty lines.
- Identical restrictions should be set on all the vty lines, because a user can attempt to connect to any of them.
Secure VTY Access Example
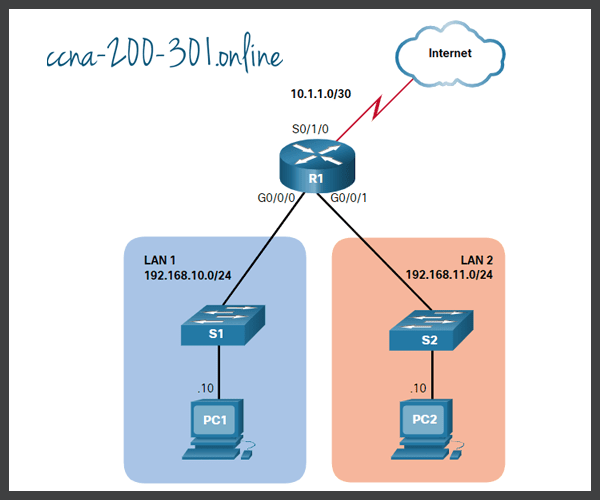
The topology in the figure is used to demonstrate how to configure an ACL to filter vty traffic. In this example, only PC1 will be allowed to Telnet in to R1.

To increase secure access, a username and password will be created, and the login local authentication method will be used on the vty lines. The command in the example creates a local database entry for a user ADMIN and password class.
A named standard ACL called ADMIN-HOST is created and identifies PC1. Notice that the deny any has been configured to track the number of times access has been denied.
The vty lines are configured to use the local database for authentication, permit Telnet traffic, and use the ADMIN-HOST ACL to restrict traffic.
R1(config)# username ADMIN secret class
R1(config)# ip access-list standard ADMIN-HOST
R1(config-std-nacl)# remark This ACL secures incoming vty lines
R1(config-std-nacl)# permit 192.168.10.10
R1(config-std-nacl)# deny any
R1(config-std-nacl)# exit
R1(config)# line vty 0 4
R1(config-line)# login local
R1(config-line)# transport input telnet
R1(config-line)# access-class ADMIN-HOST in
R1(config-line)# end
R1#
In a production environment, you would set the vty lines to only allow SSH, as shown in the example.
R1(config)# line vty 0 4
R1(config-line)# login local
R1(config-line)# transport input ssh
R1(config-line)# access-class ADMIN-HOST in
R1(config-line)# end
R1#
Verify the VTY Port is Secured
After the ACL to restrict access to the vty lines is configured, it is important to verify that it is working as expected.
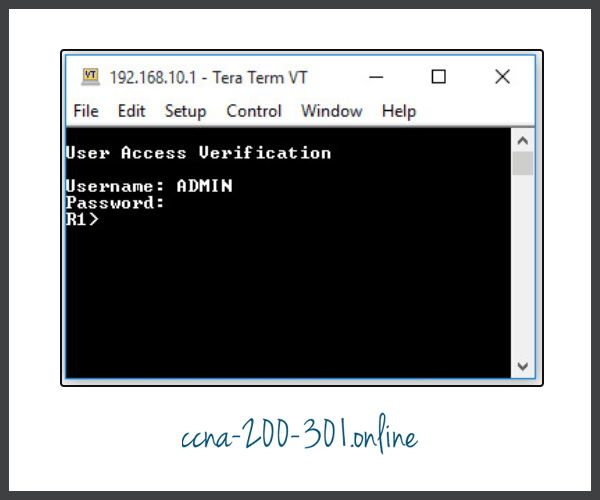
As shown in the figure, when PC1 Telnets to R1, the host will be prompted for a username and password before successfully accessing the command prompt.

This verifies that PC1 can access R1 for administrative purposes.
Next, we test the connection from PC2. As shown in this figure, when PC2 attempts to Telnet, the connection is refused.

To verify the ACL statistics, issue the show access-lists command. Notice the informational message displayed on the console regarding the admin user. An informational console message is also generated when a user exits the vty line.
The match in the permit line of the output is a result of a successful Telnet connection by PC1. The match in the deny statement is due to the failed attempt to create a Telnet connection by PC2, a device on the 192.168.11.0/24 network.
R1#
Oct  9 15:11:19.544: %SEC_LOGIN-5-LOGIN_SUCCESS: Login Success [user: admin] [Source: 192.168.10.10] [localport: 23] at 15:11:19 UTC Wed Oct 9 2019
R1# show access-lists
Standard IP access list ADMIN-HOST
    10 permit 192.168.10.10  (2 matches)
    20 deny   any  (2 matches)
R1#
Syntax Checker – Secure the VTY Ports
Secure the vty lines for remote administrative access.

Create a local database entry for the name ADMIN and secret class.
R1(config)#username ADMIN secret class
Create a named standard ACL called ADMIN-HOST.
R1(config)#ip access-list standard ADMIN-HOST
Create a permit ACE for the host with IP address 192.168.10.10.
R1(config-std-nacl)#permit host 192.168.10.10
Next, add the implicit deny any and return to global configuration mode.
R1(config-std-nacl)#deny any
R1(config-std-nacl)#exit
Enter vty configuration mode to configure the five vty lines (i.e., 0 – 4).
R1(config)#line vty 0 4
Use the login local method for authentication and permit Telnet traffic.
R1(config-line)#login local
R1(config-line)#transport input telnet
Restrict inbound access to PC1 only using the access-class command and the named ACL ADMIN-HOST and return to privileged EXEC mode.
R1(config-line)#access-class ADMIN-HOST in
R1(config-line)#end
PC1 attempted to Telnet to R1 and was successful. PC2 attempted and was unsuccessful. Verify the ACL statistics to see if the ACLs are working as expected.
R1#show access-lists
Standard IP access list ADMIN-HOST
    10 permit 192.168.10.10 (2 matches)
    20 deny   any (2 matches)
You have successfully modified an IPv4 numbered ACL on R1.
Ready to go! Keep visiting our networking course blog, give Like to our fanpage; and you will find more tools and concepts that will make you a networking professional.


