Configure a Cisco IOS DHCPv4 Server
Summary
This topic configure a router as a DHCPv4 server. Start learning CCNA 200-301 for free right now!!
Table of Contents
Cisco IOS DHCPv4 Server
Now you have a basic understanding of how DHCPv4 works and how it can make your job a bit easier. If you do not have a separate DHCPv4 server, this topic will show you how to configure a Cisco IOS router to act as one. A Cisco router running Cisco IOS software can be configured to act as a DHCPv4 server. The Cisco IOS DHCPv4 server assigns and manages IPv4 addresses from specified address pools within the router to DHCPv4 clients.

Steps to Configure a Cisco IOS DHCPv4 Server
Use the following steps to configure a Cisco IOS DHCPv4 server:
Step 1. Exclude IPv4 addresses.
Step 2. Define a DHCPv4 pool name.
Step 3. Configure the DHCPv4 pool.
Step 1. Exclude IPv4 Addresses
The router functioning as the DHCPv4 server assigns all IPv4 addresses in a DHCPv4 address pool unless it is configured to exclude specific addresses. Typically, some IPv4 addresses in a pool are assigned to network devices that require static address assignments. Therefore, these IPv4 addresses should not be assigned to other devices. The command syntax to exclude IPv4 addresses is the following:
Router(config)# ip dhcp excluded-address low-address [high-address]
A single address or a range of addresses can be excluded by specifying the low-address and high-address of the range. Excluded addresses should be those addresses that are assigned to routers, servers, printers, and other devices that have been, or will be, manually configured. You can also enter the command multiple times.
Step 2. Define a DHCPv4 Pool Name
Configuring a DHCPv4 server involves defining a pool of addresses to assign.
As shown in the example, the ip dhcp pool pool-name command creates a pool with the specified name and puts the router in DHCPv4 configuration mode, which is identified by the prompt Router(dhcp-config)#.
The command syntax to define the pool is the following:
Router(config)# ip dhcp pool pool-name
Router(dhcp-config)#
Step 3. Configure the DHCPv4 Pool
The table lists the tasks to complete the DHCPv4 pool configuration.
The address pool and default gateway router must be configured. Use the network statement to define the range of available addresses. Use the default-router command to define the default gateway router. Typically, the gateway is the LAN interface of the router closest to the client devices. One gateway is required, but you can list up to eight addresses if there are multiple gateways.
Other DHCPv4 pool commands are optional. For example, the IPv4 address of the DNS server that is available to a DHCPv4 client is configured using the dns-server command. The domain-name command is used to define the domain name. The duration of the DHCPv4 lease can be changed using the lease command. The default lease value is one day. The netbios-name-server command is used to define the NetBIOS WINS server.
| Task | IOS Command |
|---|---|
| Define the address pool. |
network network-number [mask | / prefix-length] |
| Define the default router or gateway. |
default-router address [ address2….address8] |
| Define a DNS server. |
dns-server address [ address2…address8] |
| Define the domain name. |
domain-name domain |
| Define the duration of the DHCP lease. |
lease {days [hours [ minutes]] | infinite}
|
| Define the NetBIOS WINS server. |
netbios-name-server address [ address2…address8] |
Configuration Example
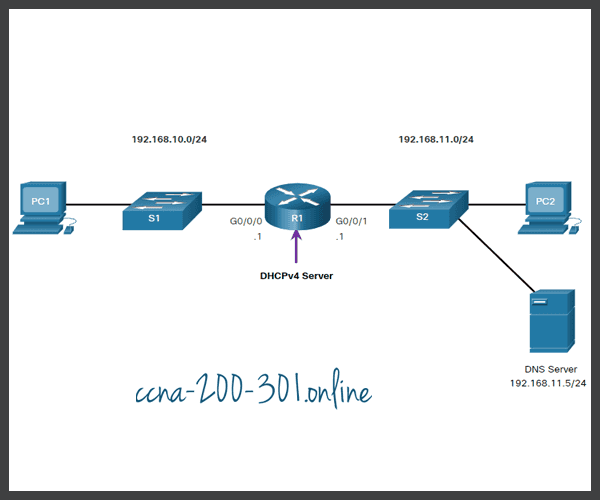
The topology for the example configuration is shown in the figure.

The example shows the configuration to make R1 a DHCPv4 server for the 192.168.10.0/24 LAN.
R1(config)# ip dhcp excluded-address 192.168.10.1 192.168.10.9
R1(config)# ip dhcp excluded-address 192.168.10.254
R1(config)# ip dhcp pool LAN-POOL-1
R1(dhcp-config)# network 192.168.10.0 255.255.255.0
R1(dhcp-config)# default-router 192.168.10.1
R1(dhcp-config)# dns-server 192.168.11.5
R1(dhcp-config)# domain-name example.com
R1(dhcp-config)# end
R1#
DHCPv4 Verification Commands
Use the commands in the table to verify that the Cisco IOS DHCPv4 server is operational.
| Command | Description |
|---|---|
show running-config | section dhcp |
Displays the DHCPv4 commands configured on the router. |
show ip dhcp binding |
Displays a list of all IPv4 address to MAC address bindings provided by the DHCPv4 service. |
show ip dhcp server statistics |
Displays count information regarding the number of DHCPv4 messages that have been sent and received. |
Verify DHCPv4 is Operational
The topology shown in the figure is used in the example output. In this example, R1 has been configured to provide DHCPv4 services. PC1 has not been powered up and, therefore, does not have an IP address.

The output for the following commands assumes PC1 has received its IPv4 addressing information from the DHCPv4 server. You may need to enter ipconfig /renew on a Windows PC to force it to send out a DHCPDISCOVER message.Click each button to see the command output verifying that DHCPv4 is operational.
Syntax Checker – Configure DHCPv4
In this Syntax Checker activity, you will configure R1 to be the DHCPv4 server for the 192.168.11.0/24 network.

Exclude the following addresses from the 192.168.11.0/24 address range:
- Exclude the .1 through the .9 address.
- Exclude the .254 address.
R1(config)#ip dhcp excluded-address 192.168.11.1 192.168.11.9
R1(config)#ip dhcp excluded-address 192.168.11.254
Configure the DHCPv4 pool with the following requirements:
- Define the pool name of LAN-POOL-2.
- Configure the network address.
- Configure the default gateway address.
- Configure the DNS server address.
- Configure example.com as the domain name.
- Return to privileged EXEC mode.
R1(config)#ip dhcp pool LAN-POOL-2
R1(dhcp-config)#network 192.168.11.0 255.255.255.0
R1(dhcp-config)#default-router 192.168.11.1
R1(dhcp-config)#dns-server 192.168.11.6
R1(dhcp-config)#domain-name example.com
R1(dhcp-config)#end
Disable the Cisco IOS DHCPv4 Server
The DHCPv4 service is enabled by default. To disable the service, use the no service dhcp global configuration mode command. Use the service dhcp global configuration mode command to re-enable the DHCPv4 server process, as shown in the example. Enabling the service has no effect if the parameters are not configured.
R1(config)# no service dhcp
R1(config)# service dhcp
R1(config)#
DHCPv4 Relay
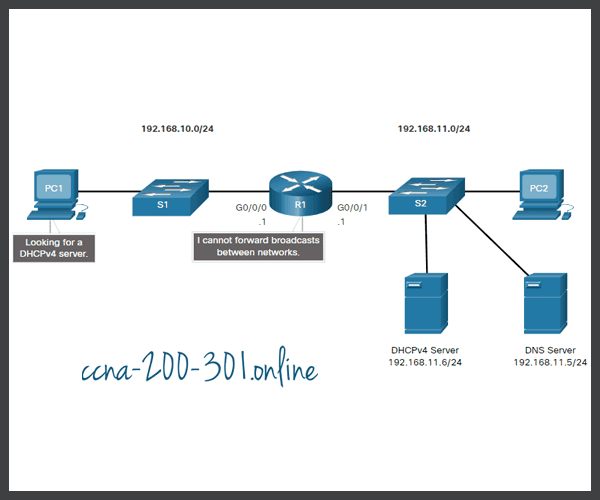
In a complex hierarchical network, enterprise servers are usually located centrally. These servers may provide DHCP, DNS, TFTP, and FTP services for the network. Network clients are not typically on the same subnet as those servers. In order to locate the servers and receive services, clients often use broadcast messages.
In the figure, PC1 is attempting to acquire an IPv4 address from a DHCPv4 server using a broadcast message. In this scenario, R1 is not configured as a DHCPv4 server and does not forward the broadcast. Because the DHCPv4 server is located on a different network, PC1 cannot receive an IP address using DHCP. R1 must be configured to relay DHCPv4 messages to the DHCPv4 server.

In this scenario, a network administrator is attempting to renew IPv4 addressing information for PC1. Click each button to see the command output as the network administrator resolves this issue.
Other Service Broadcasts Relayed
DHCPv4 is not the only service that the router can be configured to relay. By default, the ip helper-address command forwards the following eight UDP services:
- Port 37: Time
- Port 49: TACACS
- Port 53: DNS
- Port 67: DHCP/BOOTP server
- Port 68: DHCP/BOOTP client
- Port 69: TFTP
- Port 137: NetBIOS name service
- Port 138: NetBIOS datagram service
Packet Tracer – Configure DHCPv4
In this Packet Tracer Activity, you will complete the following objectives:
- Part 1: Configure a Router as a DHCP Server
- Part 2: Configure DHCP Relay
- Part 3: Configure a Router as a DHCP Client
- Part 4: Verify DHCP and Connectivity
Ready to go! Keep visiting our networking course blog, give Like to our fanpage; and you will find more tools and concepts that will make you a networking professional.


