Router and Switch File Maintenance
Summary
This topic use commands to back up and restore an IOS configuration file. Start learning CCNA 200-301 for free right now!!
Table of Contents
Router File Systems
If you are thinking that you cannot possibly remember how you configured every device in your network, you are not alone. In a large network, it would not be possible to manually configure every device. Fortunately, there are many ways to copy or update your configurations, and then simply paste them in. To do this, you will need to know how to view and manage your file systems.
The Cisco IOS File System (IFS) allows the administrator to navigate to different directories and list the files in a directory. The administrator can also create subdirectories in flash memory or on a disk. The directories available depend on the device.
The example displays the output of the show file systems command, which lists all of the available file systems on a Cisco 4221 router.
Router# show file systems
File Systems:
       Size(b)       Free(b)      Type  Flags  Prefixes
             -             -    opaque     rw   system:
             -             -    opaque     rw   tmpsys:
*   7194652672    6294822912      disk     rw   bootflash: flash:
     256589824     256573440      disk     rw   usb0:
    1804468224    1723789312      disk     ro   webui:
             -             -    opaque     rw   null:
             -             -    opaque     ro   tar:
             -             -   network     rw   tftp:
             -             -    opaque     wo   syslog:
      33554432      33539983     nvram     rw   nvram:
             -             -   network     rw   rcp:
             -             -   network     rw   ftp:
             -             -   network     rw   http:
             -             -   network     rw   scp:
             -             -   network     rw   sftp:
             -             -   network     rw   https:
             -             -    opaque     ro   cns:
Router#
This command provides useful information such as the amount of total and free memory, the type of file system, and its permissions. Permissions include read only (ro), write only (wo), and read and write (rw). The permissions are shown in the Flags column of the command output.
Although there are several file systems listed, of interest to us will be the tftp, flash, and nvram file systems.
Notice that the flash file system also has an asterisk preceding it. This indicates that flash is the current default file system. The bootable IOS is located in flash; therefore, the pound symbol (#) is appended to the flash listing, indicating that it is a bootable disk.
The Flash File System
The example displays the output from the dir (directory) command.
Router# dir
Directory of bootflash:/
   11  drwx            16384   Aug 2 2019 04:15:13 +00:00  lost+found
370945  drwx             4096   Oct 3 2019 15:12:10 +00:00  .installer
338689  drwx             4096   Aug 2 2019 04:15:55 +00:00  .ssh
217729  drwx             4096   Aug 2 2019 04:17:59 +00:00  core
379009  drwx             4096  Sep 26 2019 15:54:10 +00:00  .prst_sync
80641  drwx             4096   Aug 2 2019 04:16:09 +00:00  .rollback_timer
161281  drwx             4096   Aug 2 2019 04:16:11 +00:00  gs_script
112897  drwx           102400   Oct 3 2019 15:23:07 +00:00  tracelogs
362881  drwx             4096  Aug 23 2019 17:19:54 +00:00  .dbpersist
298369  drwx             4096   Aug 2 2019 04:16:41 +00:00  virtual-instance
   12  -rw-               30   Oct 3 2019 15:14:11 +00:00  throughput_monitor_params
 8065  drwx             4096   Aug 2 2019 04:17:55 +00:00  onep
   13  -rw-               34   Oct 3 2019 15:19:30 +00:00  pnp-tech-time
249985  drwx             4096  Aug 20 2019 17:40:11 +00:00  Archives
   14  -rw-            65037   Oct 3 2019 15:19:42 +00:00  pnp-tech-discovery-summary
   17  -rw-          5032908  Sep 19 2019 14:16:23 +00:00  isr4200_4300_rommon_1612_1r_SPA.pkg
   18  -rw-        517153193  Sep 21 2019 04:24:04 +00:00  isr4200-universalk9_ias.16.09.04.SPA.bin
7194652672 bytes total (6294822912 bytes free)
Router#
Because flash is the default file system, the dir command lists the contents of flash. Several files are located in flash, but of specific interest is the last listing. This is the name of the current Cisco IOS file image that is running in RAM.
The NVRAM File System
To view the contents of NVRAM, you must change the current default file system by using the cd (change directory) command, as shown in the example.
Router#
Router# cd nvram:
Router# pwd
nvram:/
Router# dir
Directory of nvram:/
32769  -rw-             1024                      startup-config
32770  ----               61                      private-config
32771  -rw-             1024                      underlying-config
    1  ----                4                      private-KS1
    2  -rw-             2945                      cwmp_inventory
    5  ----              447                      persistent-data
    6  -rw-             1237                      ISR4221-2x1GE_0_0_0
    8  -rw-               17                      ecfm_ieee_mib
    9  -rw-                0                      ifIndex-table
   10  -rw-             1431                      NIM-2T_0_1_0
   12  -rw-              820                      IOS-Self-Sig#1.cer
   13  -rw-              820                      IOS-Self-Sig#2.cer
33554432 bytes total (33539983 bytes free)
Router#
The present working directory command is pwd. This command verifies that we are viewing the NVRAM directory. Finally, the dir command lists the contents of NVRAM. Although there are several configuration files listed, of specific interest is the startup-configuration file.
Switch File Systems
With the Cisco 2960 switch flash file system, you can copy configuration files, and archive (upload and download) software images.
The command to view the file systems on a Catalyst switch is the same as on a Cisco router: show file systems, as displayed in the example.
Switch# show file systems
File Systems:
       Size(b)     Free(b)     Type  Flags  Prefixes
*    32514048    20887552     flash     rw    flash:
          -           -      opaque     rw       vb:
          -           -      opaque     ro       bs:
          -           -      opaque     rw   system:
          -           -      opaque     rw   tmpsys:
        65536       48897     nvram     rw    nvram:
          -           -      opaque     ro   xmodem:
          -           -      opaque     ro   ymodem:
          -           -      opaque     rw     null:
          -           -      opaque     ro      tar:
          -           -     network     rw     tftp:
          -           -     network     rw      rcp:
          -           -     network     rw     http:
          -           -     network     rw      ftp:
          -           -     network     rw      scp:
          -           -     network     rw    https:
          -           -     opaque      ro      cns:
Switch#
Use a Text File to Back Up a Configuration
Configuration files can be saved to a text file by using Tera Term, as shown in the figure.
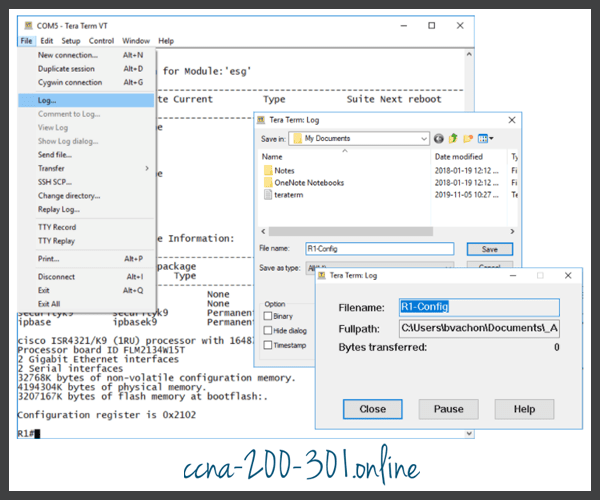
Step 1. On the File menu, click Log.
Step 2. Choose the folder location and filename to save the file and click Save. Tera Term will open Tera Term: Log window and will now capture all commands and output generated in the terminal window.
Step 3. To capture the current configuration, enter the show running-config or show startup-config command privileged EXEC command. The text displayed in the terminal window will also be directed to the chosen file.
Step 4. When the capture is complete, select Close in the Tera Term: Log window.
Step 5. Open the file to verify that the configuration was captured properly and not corrupt.
Use a Text File to Restore a Configuration
A configuration can be copied from a file and then directly pasted to a device. The IOS executes each line of the configuration text as a command. This means that the file will require editing to ensure that encrypted passwords are in plaintext, and that non-command text such as –More– and IOS messages are removed. In addition, you may want to add enable and configure terminal to the beginning of the file or enter global configuration mode before pasting the configuration. This process is discussed in the lab later is this topic.
Instead of copying and pasting, a configuration can be restored from a text file by using Tera Term, as shown in the figure.

When using Tera Term, the steps are as follows:
Step 1. On the File menu, click Send file.
Step 2. Locate the file to be copied into the device and click Open.
Step 3. Tera Term will paste the file into the device.
The text in the file will be applied as commands in the CLI and become the running configuration on the device.
Use TFTP to Back Up and Restore a Configuration
Use TFTP to Back Up a Configuration
Copies of configuration files should be stored as backup files in the event of a problem. Configuration files can be stored on a Trivial File Transfer Protocol (TFTP) server, or a USB drive. A configuration file should also be included in the network documentation.
To save the running configuration or the startup configuration to a TFTP server, use either the copy running-config tftp or copy startup-config tftp command, as shown in the example.
R1# copy running-config tftp
Remote host []?192.168.10.254
Name of the configuration file to write[R1-config]? R1-Jan-2019
Write file R1-Jan-2019 to 192.168.10.254? [confirm]
Writing R1-Jan-2019 !!!!!! [OK]
Follow these steps to back up the running configuration to a TFTP server:
Step 1. Enter the copy running-config tftp command.
Step 2. Enter the IP address of the host where the configuration file will be stored.
Step 3. Enter the name to assign to the configuration file.
Step 4. Press Enter to confirm each choice.
Use TFTP to Restore a Configuration
To restore the running configuration or the startup configuration from a TFTP server, use either the copy tftp running-config or copy tftp startup-config command. Use the following steps to restore the running configuration from a TFTP server:
Step 1. Enter the copy tftp running-config command.
Step 2. Enter the IP address of the host where the configuration file is stored.
Step 3. Enter the name to assign to the configuration file.
Step 4. Press Enter to confirm each choice.
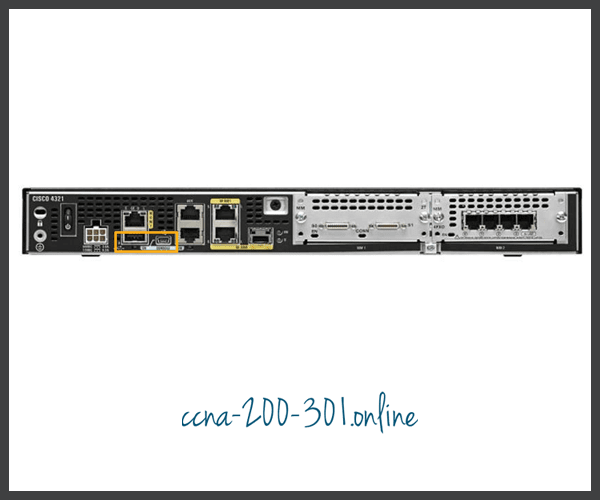
USB Ports on a Cisco Router
The Universal Serial Bus (USB) storage feature enables certain models of Cisco routers to support USB flash drives. The USB flash feature provides an optional secondary storage capability and an additional boot device. Images, configurations, and other files can be copied to or from the Cisco USB flash memory with the same reliability as storing and retrieving files by using the Compact Flash card. In addition, modular integrated services routers can boot any Cisco IOS Software image saved on USB flash memory. Ideally, USB flash can hold multiple copies of the Cisco IOS and multiple router configurations. There is also a USB Type B mini port that can be used for console connections. The USB ports of a Cisco 4321 Router are shown in the figure.
Use the dir command to view the contents of the USB flash drive, as shown in the example.
Router# dir usbflash0:
Directory of usbflash0:/
1 -rw- 30125020 Dec 22 2032 05:31:32 +00:00 c3825-entservicesk9-mz.123-14.T
63158272 bytes total (33033216 bytes free)
Use USB to Back Up and Restore a Configuration
When backing up to a USB port, it is a good idea to issue the show file systems command to verify that the USB drive is there and confirm the name, as shown in the example.
R1# show file systems
File Systems:
		Size(b)       Free(b)      Type  Flags  Prefixes
             -             -    opaque     rw   archive:
             -             -    opaque     rw   system:
             -             -    opaque     rw   tmpsys:
             -             -    opaque     rw   null:
             -             -   network     rw   tftp:
*    256487424     184819712      disk     rw   flash0: flash:#
             -             -      disk     rw   flash1:
        262136        249270     nvram     rw   nvram:
             -             -    opaque     wo   syslog:
             -             -    opaque     rw   xmodem:
             -             -    opaque     rw   ymodem:
             -             -   network     rw   rcp:
             -             -   network     rw   http:
             -             -   network     rw   ftp:
             -             -   network     rw   scp:
             -             -    opaque     ro   tar:
             -             -   network     rw   https:
             -             -    opaque     ro   cns:
    4050042880    3774152704  usbflash     rw   usbflash0:
R1#
Notice the last line of output shows the USB port and name: “usbflash0:”.
Next, use the copy run usbflash0:/ command to copy the configuration file to the USB flash drive. Be sure to use the name of the flash drive, as indicated in the file system. The slash is optional but indicates the root directory of the USB flash drive.
The IOS will prompt for the filename. If the file already exists on the USB flash drive, the router will prompt to overwrite, as shown in the examples.
When copying to USB flash drive, with no pre-existing file will display the following output.
R1# copy running-config usbflash0:
Destination filename [running-config]? R1-Config
5024 bytes copied in 0.736 secs (6826 bytes/sec)
When copying to USB flash drive, with the same configuration file already on the drive will display the following output.
R1# copy running-config usbflash0:
Destination filename [running-config]? R1-Config
%Warning:There is a file already existing with this name
Do you want to over write? [confirm]
5024 bytes copied in 1.796 secs (2797 bytes/sec)
R1#
Use the dir command to see the file on the USB drive and use the more command to see the contents, as shown in the example.
R1# dir usbflash0:/
Directory of usbflash0:/
    1  drw-     0  Oct 15 2010 16:28:30 +00:00  Cisco
   16  -rw-  5024   Jan 7 2013 20:26:50 +00:00  R1-Config
4050042880 bytes total (3774144512 bytes free)
R1#
R1# more usbflash0:/R1-Config
!
! Last configuration change at 20:19:54 UTC Mon Jan 7 2013 by
admin version 15.2
service timestamps debug datetime msec
service timestamps log datetime msec
no service password-encryption
!
hostname R1
!
boot-start-marker
boot-end-marker
!
logging buffered 51200 warnings
!
no aaa new-model
!
no ipv6 cef
R1#
Restore Configurations with a USB Flash Drive
To copy the file back, it will be necessary to edit the USB R1-Config file with a text editor. Assuming the file name is R1-Config, use the command copy usbflash0:/R1-Config running-config to restore a running configuration.
Password Recovery Procedures
Passwords on devices are used to prevent unauthorized access. For encrypted passwords, such as the enable secret passwords, the passwords must be replaced after recovery. Depending on the device, the detailed procedure for password recovery varies. However, all the password recovery procedures follow the same principle:
Step 1. Enter the ROMMON mode.
Step 2. Change the configuration register.
Step 3. Copy the startup-config to the running-config.
Step 4. Change the password.
Step 5. Save the running-config as the new startup-config.
Step 6. Reload the device.
Console access to the device through a terminal or terminal emulator software on a PC is required for password recovery. The terminal settings to access the device are:
- 9600 baud rate
- No parity
- 8 data bits
- 1 stop bit
- No flow control
Password Recovery Example
Packet Tracer – Back Up Configuration Files
In this activity you will restore a configuration from a backup and then perform a new backup. Due to an equipment failure, a new router has been put in place. Fortunately, backup configuration files have been saved to a Trivial File Transfer Protocol (TFTP) Server. You are required to restore the files from the TFTP Server to get the router back online as quickly as possible.
Lab – Use Tera Term to Manage Router Configuration Files
In this lab, you will complete the following objectives:
- Part 1: Configure Basic Device Settings
- Part 2: Use Terminal Emulation Software to Create a Backup Configuration File
- Part 3: Use a Backup Configuration File to Restore a Router
Lab – Use TFTP, Flash, and USB to Manage Configuration Files
In this lab, you will complete the following objectives:
- Part 1: Build the Network and Configure Basic Device Settings
- Part 2: (Optional) Download TFTP Server Software
- Part 3: Use TFTP to Back Up and Restore the Switch Running Configuration
- Part 4: Use TFTP to Back Up and Restore the Router Running Configuration
- Part 5: Back Up and Restore Running Configurations Using Router Flash Memory
- Part 6: (Optional) Use a USB Drive to Back Up and Restore the Running Configuration
Lab – Research Password Recovery Procedures
In this lab, you will complete the following objectives:
- Part 1: Research the Configuration Register
- Part 2: Document the Password Recovery Procedure for a Specific Cisco Router
Ready to go! Keep visiting our networking course blog, give Like to our fanpage; and you will find more tools and concepts that will make you a networking professional.